Eye School Principles
By Dino Dilio
An Illustrated Guide to Classic Eye Makeup
Hello Gorgeous!
Thank you for ordering your DDB Art of Eye Shadow Palette. Dino includes this Art of Eye Makeup Guide that only you have access to. It illustrates and instructs the versatility of each product in every kit for the prettiest eyes in town. Enjoy the rave reviews.
“Some eyes touch you more than hands ever could.”
Chances are you’ve been to high school, now let me take you to “Eye School”. A major portion of my make-up lessons is dedicated to eye make-up and the eyes are my favourite part of makeup to do. So much can be done to define and enhance their vitality or transform their appearance entirely. Eye makeup doesn’t have to be complicated, and ... contrary to what the salesgirls say … you certainly don’t have to wear all your eye makeup, all the time. This is an excerpt from my forth coming book “Let’s Face It!” where I revisit, explore, and update the forgotten Art of Classic Beauty Principles and Techniques that will softly accent your eyes or take them out on the town with more dramatic depth and definition.
With less makeup and steps, let me share with you my method of selecting the right orchestration of eye makeup and tools, my signature techniques, tips, and tricks, for simplified and sophisticated eye defining moments and elevated elegance — from fresh to fabulous, natural to knock-out!
Beauty school has never been this much fun!

Optical Illusions with Light & Dark
Highlight & Contour — Highlight and contour is the essence, heart, and soul of beauty makeup. It is the core technique behind every layer and step of a makeup application.
Tip: Always keep in mind that anything you wish to look slimmer or smaller, you make darker and anything you wish to make fuller or larger, you make lighter.
Highlights are created with colours that are lighter than the skin to reflect light, draw attention to the area where it is applied and make these areas appear to advance, expand and creating the illusion of more space, extra volume, attention, and youth. Shimmer, metallic and shiny textured colours will double the impact of a highlighter's reflective properties. The lighter, the colour the brighter the effect will be.
Contours are made with colours darker than the face to absorb light causing the areas to recede, slim, smooth or flatten creating the illusion new shapes, definition, dimension, and drama. For the best results the contour texture should be matte. These two cunning characters dance magically together in varying degrees and dimensions to push and pull, slim/shrink and stretch, lift and shift, any part of the face giving you the power to shape, sculpt and signify your style and signature.
Example: This popular palette of neutral eyeshadow colours, bookended between white and black, is a perfect representation for a versatile range of colours from light tints to medium tones to dark shades. I used this palette to make up the eye illustrations which are detailed in the coming pages

Ombre/Graduated Eye Makeup Design


Sculpted Eye Makeup Design
The Eyeshadow Colour and Value Scale

Technically, every colour on the wheel can be considered for eye makeup. All your colour choices should be gauged against the shade of your skin. You control the choice of every shade (how light or dark) and its texture
(shimmer, metallic, or matte).
· Lightest Tints – Lighter than your skin by 2 or 4 more tints. Highlights, lift-out, and amplifies: the tear duct, lid (except full) and brow bone.
· Medium Tones – Darker than your skin by 2 or more tones. Softly shades full lids, crease, subtle lower liner. Tempers bright and dark shades
· Dark Shades – 3 or mores shades darker than the medium colour. Versatile. Dramatizes the lid, deep crease, liner, and the glam zone accent. Tip: Brown, Brack (half brown, half black), Charcoal, Navy, Purple, and Black are excellent classic choices.
Tip: Locate your eye colour on the wheel. The direct colour across for your eye colour will be its most complimentary.
To help you grasp this important pretty principle, I always use the Gray Scale, an invaluable tool that helps you define and measure the lightness or darkness of colours based on the gray scale. It's the specific tint, tone, or shade of a particular colour, also known as Monochromatic. As shown on next page, each colour on the colour wheel appears at its lightest as it reaches the center of the wheel. Colours become darker at the perimeter. This scale below helps you organize and identify the range of shades of your current makeup colours by “value” (how light or dark) and assists you in designing makeup looks around the clock — from super soft to super nova. Remember, colours of high value and intensity project while low value, low intensity colours recede. Keep it realistic unless you’re hitting the stage.


DDB Supreme Eye Makeup Brush Set
Meet the quintessential set of practical, multipurpose eye makeup brushes to deliver the very best results. (I cheekily named each brush after a member of my favourite “Baby Love” girl group—the super, duper Supremes as they individually introduce themselves in concert.) Each brush is designed with a specific shape and size for easy, optimum, technically perfect eye makeup applications, effects and finishes. 100% Synthetic and vegan friendly. Available individually, or as a set in a smart waterproof protective pouch along with a bonus Duo Pro Stainless Cosmetic Sharpener.
www.dinodilio.com/ddb-makeup-shop/mhgg3631kz71ugpzthrzocm8pb6qdg
· The Multipurpose Emphasis Fluff Brush — This brush is sized to apply colour to the lid and brow bone. Load one side and use perpendicularly to contour the crease. The chiseled tip works well for creating the smoky eye liner look. Flo, the sassy one on the left.
· The Quill Soft Crease & Blending Brush — This Japanese calligraphy inspired quill brush is perfect for soft washes of colour and subtle crease definition. It diffuses and blends eyeshadow for a pro finish. Mary, the sexy one in the center.
· The Micro-Chisel Angle Eyebrow and Liner Brush — This versatile eye-detailing brush is designed to shape, colour and define eyebrows, as well as for delicate to dynamic eye-line detailing. Use dry or wet.

Bonus Tools:
· The Spooley / Mascara Brush — Assists in successful mascara application and for eyebrow grooming, and to refine and de-clump mascara. Handy facial hair grooming tool.
· Duo Pro Stainless Cosmetic Sharpener
· The Mighty Lighted Magnifying Mirror — Extremely useful for detailing, up-close inspection, and fine-tuning eye makeup. Check Superhuman models with adjustable lighting settings and a magnification that best mimics/matches your contact/glasses prescription.
Dino’s Top Eye Makeup Techniques, Tricks, and Tips
Eye Makeup Prep — whether you’re planning on wearing foundation or not, great eye makeup always looks best with a little prep work. a multi-purpose double-duty / concealer/revealer refreshes, opens and brightens the eyes by neutralizing and "reversing" colours in shadow. This vital step reveals and articulates your eye’s identity for infinite levels of loveliness and stand-out eyes that pop!
Beauty Pit Stop — The Load, Prepare, Apply, and Blend Technique
This four-step technique properly transfers colour from a powder tablet to your brush and then to your face to ensure a smooth and controlled application that will prevent colour fall-out.
The Artist Powder Mat —here’s where you'll load and prepare your brushes with powder colour on paper towel before applying to your eyes … and to wipe colour from your brushes when switching to different colours with the same brush.
The Clever Cotton Swab — Used to remove and fix, mistakes, and smudge liner. The tip is idea for spot-highlighting the tear duct.
Eye Guide I
When recreating any eye makeup look, it’s important to have a basic grasp of the structure of the eye. The eye diagrams below divide and identify distinct points, pathways, and zones of your eyes that form easy-to-follow frames of guidelines to use when applying, blending, and matching eye makeup. Use the network of dotted lines below as your guide for optimum colour placement and to help you maintain balance and symmetry as you highlight, shade and blend. More colours can be blended and layered in for more dimension, elevation, and attention with infinite possibilities.


Left Eye Guide:
A = The Head of the Eyebrow / Inner Eye Frame: Fullest part of brow. Vertical line of the nose.
B = The Arch: Highest point of the eyebrow. Diagonal line intersects wing of nose and pupil.
C = The Tail of the Eyebrow / Outer Eye Frame: Tapers to a fine point. Diagonal line from outer eye to wing of nose.
D = The Fade-Out Point — vertical line (not shown) at inside edge of iris. Fade-out point for inner liner and crease colour.
G = The Glam Zone: Outer third from outside edge to the C point. The playground for glam eyes.
Right Eye Guide:
Identifies the interior elements of the eye: the pupil (darkest center), the iris (coloured part of the eye), the tear duct and the sclera (the white of the eye). In addition to defining the colour of your eyes, the iris’s inside and outside edges serve as imperative guidelines for balanced and symmetrical eye makeup. Dotted lines separate the eye into thirds, identifying the eyelid, the crease, and the brow bone.
Eyebrow Architecture
Well-groomed eyebrows frame the eyes and provide distinction and expression to the face. The best eyebrow shape, placement and colour can make a surprising difference! Strive for graceful brows that flatter the face, rather than take it over. For daywear, with a light hand, fill in and enhance only the sparse areas of your eyebrows with the Precision Brow Stylist. Work in straight direct lines from A to B to C to establish a natural flow from its thickest start from the head to arch/apex then tapers and ends to a fine thin point at the tail. Alternatively, dry eyebrow shadow applied with the micro angle brush can take the place of the brow stylist pencil or be used in conjunction with each other to further unify and elevate the brows projection. Complete and finish with the Spooley / Mascara Brush. This makes the difference between fake and finished brows. Seal in colour and place brow hairs with Clear Brow Set/Groom Gel.

Organic Brow Stylist Pencil

Classic Eye Shadow

Diva Dramatic Brow Pencil + Eye Shadow
Application: Take your eyebrow product colour cue from your actual colouring—somewhere between your natural eyebrow and hair colour. If you treat your hair, the eyebrow shade should match or harmonize with that colour. For daywear, with a light hand, fill in and enhance only the sparse areas of your eyebrows with the Brow Stylist. Work in straight direct lines from A to B to C to establish a natural flow from its thickest start from the head to arch/apex then tapers and ends to a fine thin point at the tail. Not pelts please!
Tip: Always use this indispensable Spooley/Mascara Brush on the opposite end of the Brow Stylist to complete and finish. This makes the difference between fake and finished brows. Brush upwards moving at a 45-degree angle to unify and lift eyebrows. Refine shape and edges with cotton swabs. Seal in place with Clear Brow Set/Groom Gel. Lay down long brow hairs that surpass the top of the eyebrow lining up between the brows head and arch and arch and tail.

Precision Brow Stylist
The super-fine tip allows you to create hair-like strokes to spot-fill sparse areas, cover white and silver hairs, soft enhancement, boost body—and create the perfect tail. Built-in spooley brush is ideal to smooth, refine, and finish. www.dinodilio.com/ddb-makeup-shop/brow-stylist-pencil-blonde

Clear Brow Groom & Set
This colourless, gel mascara instantly lifts and groom’s brows for a clean, polished look. Tames, unruly eyebrow hairs to lock in place. Use after eyebrow colour to set in place for long wear. Tapered brush encourages maximum control with thin and wide ends.
www.dinodilio.com/ddb-makeup-shop/clear-brow-groom-set-gel
Remember; Eyebrows are sisters, not twins.
Don’t obsess over matching them exactly.
This is what gives your face its own unique character.
Marvy Mascara Moves

Did you know that mascara is the world’s number one cosmetic that dates to 1872?
Most people put the focus on the tips of the lashes to make them look their longest. My approach is the opposite and one I learned while studying makeup in San Francisco on the very day an 8.6 earthquake hit. You could say this technique is earth shattering.
With a good-quality mascara, a skillful hand, and precise application this intricate way of putting on mascara is the foundation of impressive eye definition – all on its own. The heavy dense deposit of mascara along the base of lashes causes the roots to connect creating an elegant discreet liner that defines and projects the beauty of your eyes… all with one product.
Notice how the technique defines and beautifies the left eye as compared to the right eye that looks disconnected and unflattering.

Here’s how: Hold the wand horizontal to your lashes and carefully place and push the wand deep into the roots (the base of the lashes) with a firm but gentle motion. Hold brush here and slightly rock the brush, as it rests against the lash line. Wiggle and jiggle the wand side-to-side to deposit maximum colour in three sections; the inside end from tear duct to inside edge of iris, the middle between the edges of iris, and the outside end from edge of iris to end of eye. Rotate the wand and repeat in sections.
Next, push the wand up and through the tips to lift and curl. Gently push the tips back and hold the wand in place for five seconds to set and extend your flutter appeal. Want more lash lushness? Move the tip of the mascara brush vertically through each lash, up and out in the direction they grow, (towards the nose at the inside, straight up in the middle, and up and out towards the ear).
Use a spooley /mascara brush to separate any clumps, refine and achieve a wispy look. For bottom lashes, aim the wand’s tip vertically at the roots and use a crisscross action to colour and lengthen. Finish with the same technique used for top lashes to direct and place bottom lashes. Place a spooley brush under and behind lashes and roll the brush forward.
Tip: Brand-new mascaras often have too much mascara on the brush, which can make the application messy. Lightly wipe the sides and tip of the wand with a tissue to remove the excess.
www.dinodilio.com/ddb-makeup-shop/ddb-sensitive-mascara
The Lash Bar

Light & Lovely Mascara x 1

Lush Mascara x 3

Plush & Wispy False Lash + Mascara x 3
The Eye Liner Lounge
Eye liner defines and can change the eye shape, make an impact on its own and picks up where mascara leaves off, making lashes look thicker and adding another dimension to full eye makeup. The following products and techniques will add flattering definition to your eyes—whether you like them to look naturally lovely or more dramatic.

1

2

3

4
1 / 2 —The Waterline / Tarsal Plate. Applying a white, flesh-toned, or bright blue pencil to this area makes the eye appear brighter and more open. Darkening the waterline lends the eye a sensual, studio 54 dimension.
3 — Powder Eyeshadow. The easiest and softest way to define the eyes is to apply eyeshadow dry with the micro angle brush burring it deep into the lash line.
4 —Eye Liner Pencil plus Dry Eyeshadow — For a more dimensional look, pencil can be layered with a matching eyeshadow traced over top using with micro angle brush to smooth out the application, extend longevity, and make waterproof.
Smoky Liner — Smouldering and sultry, this versatile eye liner design encompasses the entire eye first with black liner. Next a matching or slightly lighter eyeshadow is burnishes over edges to diffuse and smoke out the line. Rim waterline with black for ultra-provocativeness.
Eyeliner Application: Natural-looking liner is placed in that intricate place between—and along—the roots of your lashes, not on the waterline. Don’t attempt to finesse the look in one fluid line. Begin the top eyeliner at the outer edge of your eye (at the outer eyelash) and work in towards the nose. Move slowly, using overlapping short strokes. Apply light pressure for a thin line and heavier pressure for a thicker line. Begin the top eyeliner at the outer edge of your eye (at the outer eyelash) and work in towards the nose. Start with a thin line. Deposit colour deep into and along the roots. Taper the line and fade out at the inside edge of the iris. From this point, you can extend the line down to the tear duct for more emphasis. Thicken the outer edge of the liner in a slight wing to “lift”, elongate, and open the eye. Repeat the application along the lower lashes in the same manner but slightly thinner. Top and bottom ends connect at the outer end of the eye. Bottom eye liner looks best when it’s less intense unless drama is on the menu. Thicken and adjust the line to suit your eye. Thin eyelids require the thinnest line, while bigger eyes can exaggerate and thicken the line for balance. Use a cotton swab to daub away any boo-boos.
www.dinodilio.com/ddb-makeup-shop/waterproof-gel-eyeliner-pencil-noir

Eye Guide II
The top graph on the next page builds on the first Eye Guide illustrated earlier. This graph focuses on an interior inspection of the unique elements and nuances of the eye. This graph divides the eye into equal thirds with horizontal dotted lines and vertical solid lines that assists with balance and symmetry. The left eye graph shows the effectiveness of eye makeup worn only on the top of the eye. The right eye graph breaks the eye into fourths to accommodate bottom eye makeup for extra dimension, elevation, drama, and attention. Take note that the outer eye frame has been angled out to accommodate elongated and exotic designs. These graphs will help you in creating your eye makeup.

The Universally Classic Eyeshadow Patterns
Welcome to a trusted set of versatile eyes makeup designs/patterns and techniques that have proved the test of time for beautifying eyes with any colour scheme. Whether simple or artistic, the depth, colour and degree of eye makeup sets the mood for the entire face, attitude, and occasion of your look. From casually light and easy to glamourous and dressed to the nines. It’s all about the selection and placement of light, shade and dark — for eye defining moments. Pay careful attention to where the light/bright, medium/muted, and rich/dark eyeshadow colours appear the strongest, where they expand and extend, and where they merge, blend, diffuse and fade out completely.
Note: I left the white of the paper uncoloured to represent where the placement of the lightest, highlight colour.
For a different take, the colours shown can be replaced with other colours and palettes if they share the same value of light, mid-tone and dark. Today could be the Barista palette of warm ivory, tan, and brown (as shown on the right), tomorrow it can be the Your Majesty palette of cool opal, lavender and purple.
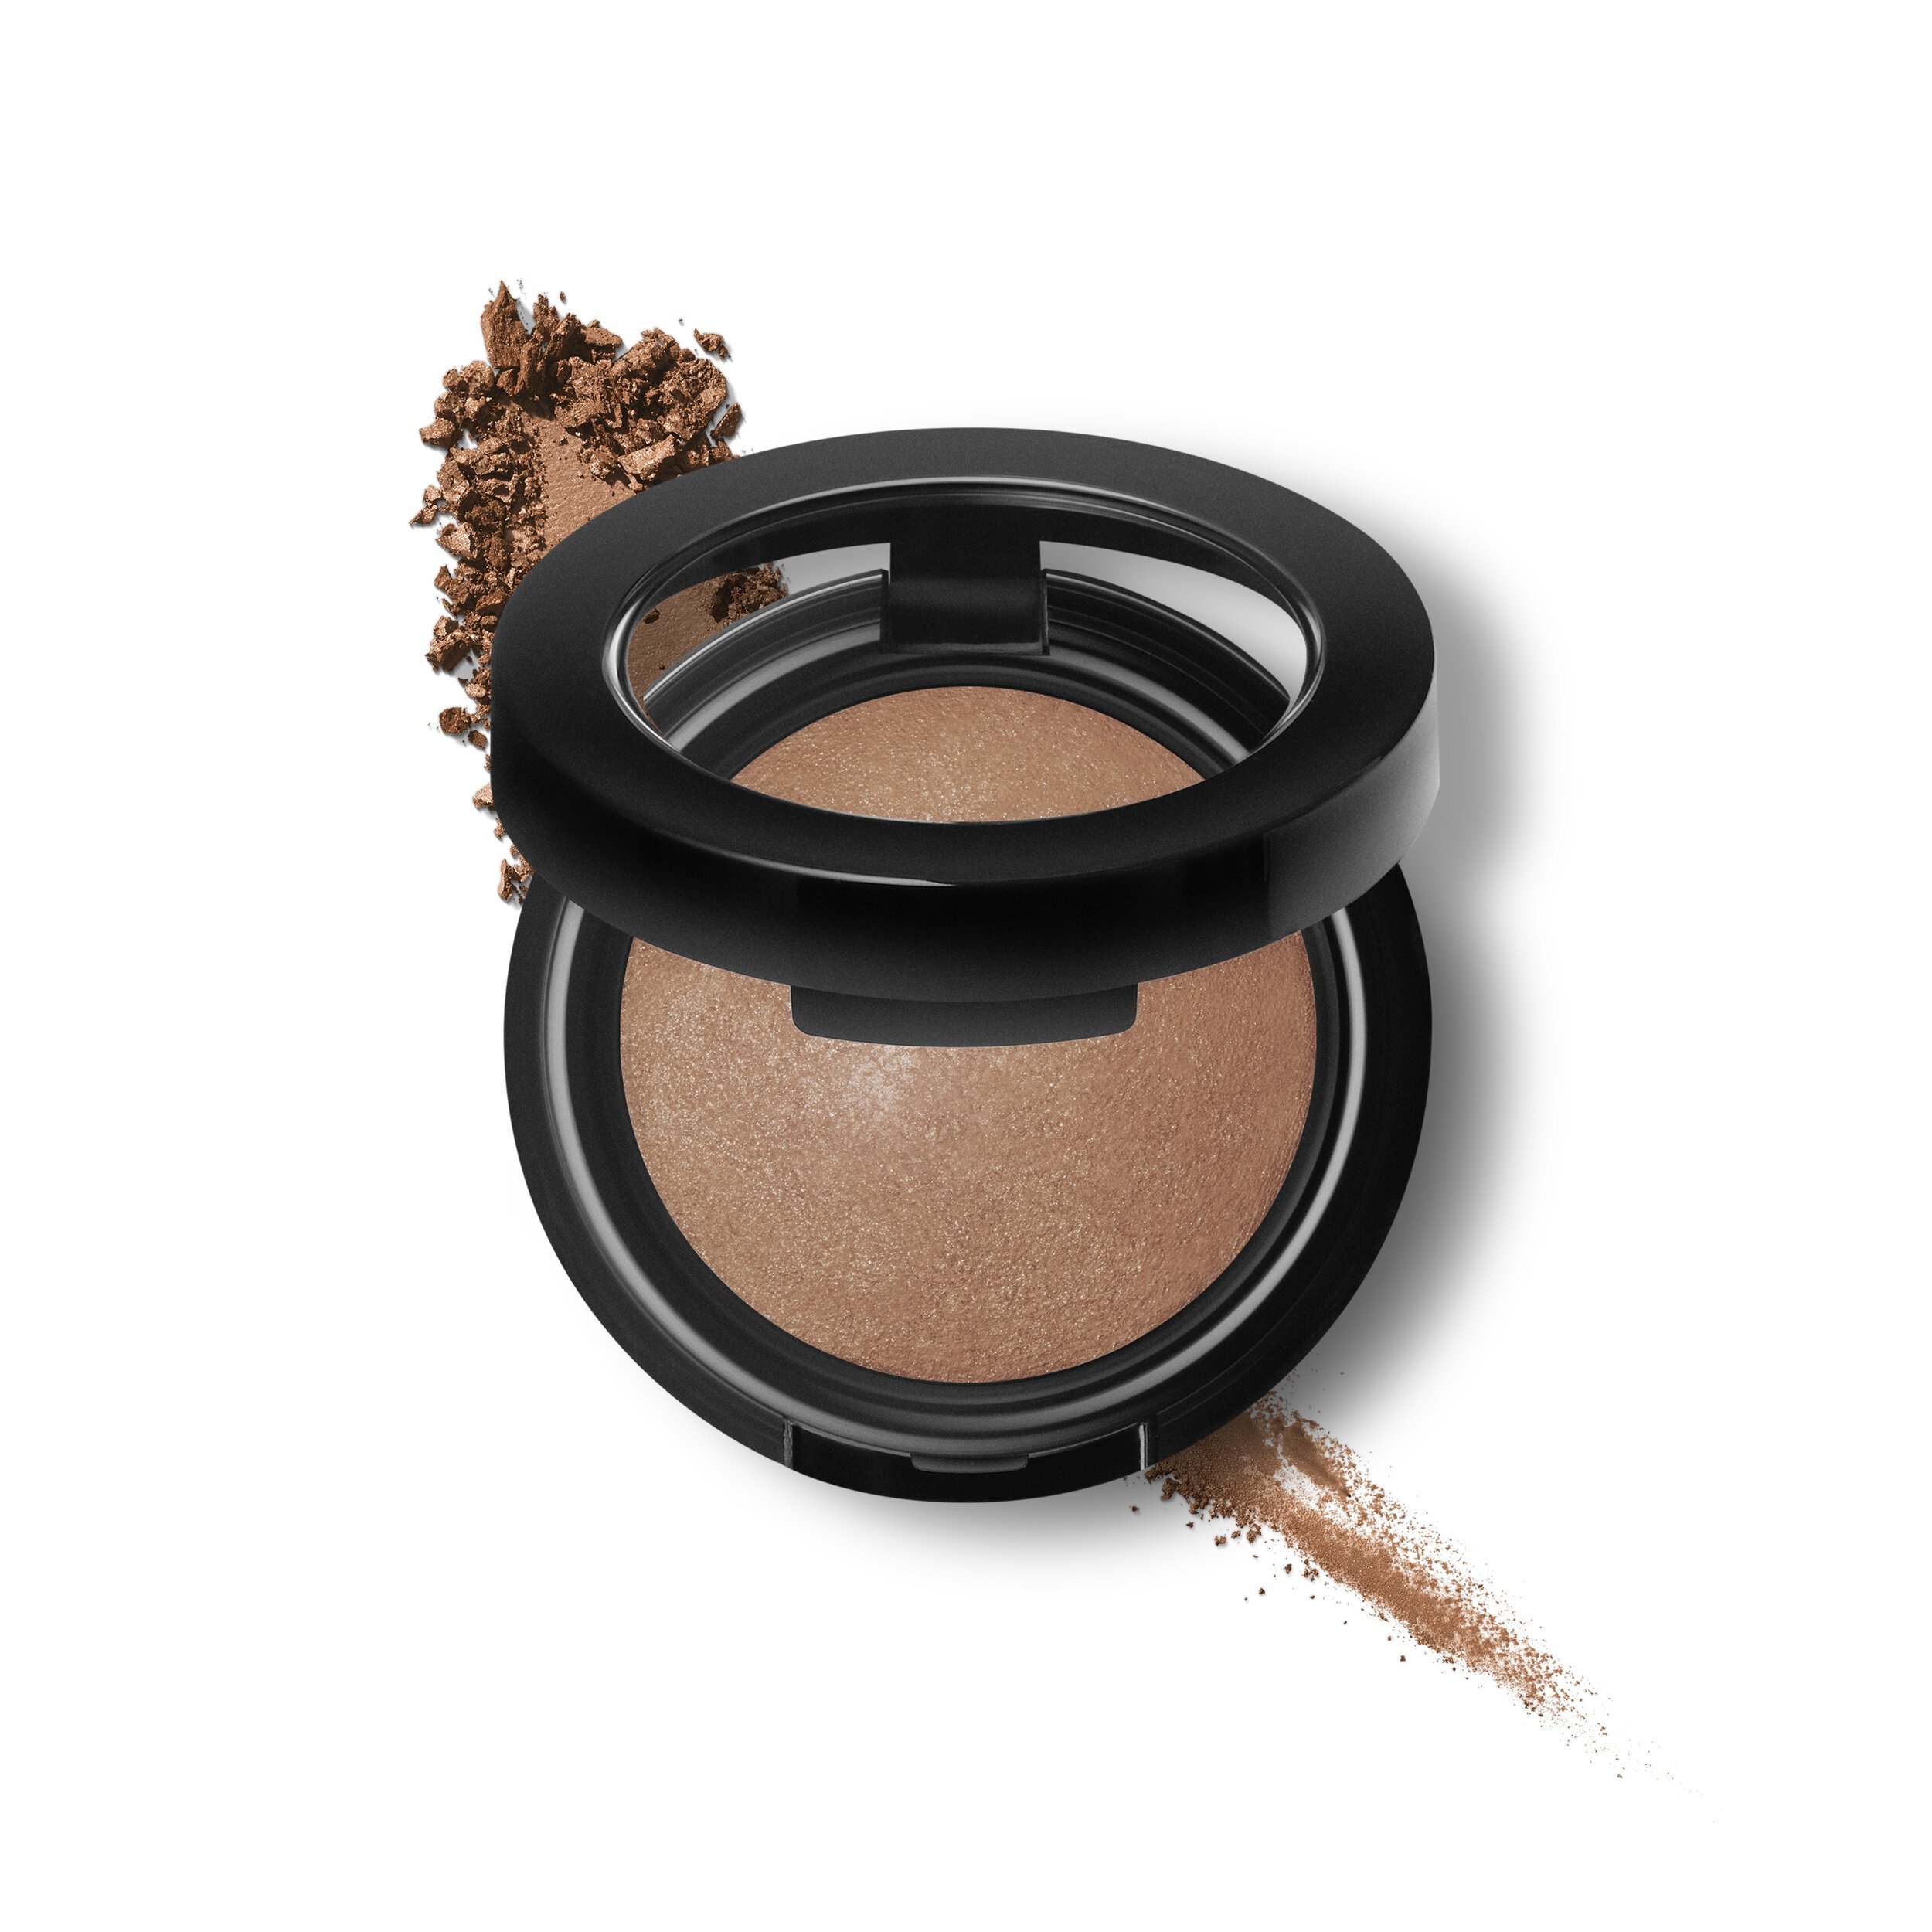
DDB Art of Eye Makeup Palettes
Choose the palette that can take your look from natural to knockout. Make your eye colour POP! Each palette presents a sophisticated array of monochromatic colours, available in three distinct tones: warm, cool, or achromatic (meaning tints of white, tones of grey and shades of black). Each colour in every DDB palette can be used on its own or combined in stages to take your eyes from softly enhanced for day to dramatically defined for night.
https://www.dinodilio.com/ddb-makeup-shop/ddb-art-of-eye-makeup-palette
The DDB Art of Eye Makeup Palette Collection
Barista: Comfortably natural, warm, earthy palette of coffee-inspired tones. Did you want cream and sugar? The softest choice and easiest entry into eye makeup! Especially effective on blue and green eyes. (Left)
Majestic — The confidently cool, classic and commanding palette. Opal to lambent lilac to majestic purple. Especially effective on green, hazel and brown eyes. (Center)
Stormy Glam — Soulful, sultry, ultra-glam achromatic sophistication for all eye colours. (Right)


The Graduated/Ombre to Smoky Eye Makeup Patterns


The first set of eyes illustrates the very first eye makeup application used by actresses in the 1930s. The right eye illustrates three shades in a dark-to-light, gradient horizontal pattern with a softly curved finish at the Outer Eye Frame. The Graduated Eye Pattern defines, opens, and projects the top of the eye for easy emphasis. This design suits all eye types especially fluffy/hooded, big round Bambi eyes. This pattern is transformed into a sultry smoky eye look by repeating, modifying, and wrapping the same colours used on the top of the eye, except the lightest, under and along the lower eye, with diffused finish
Top of Eye Emphasis
1 - Medium Shadow: Covers 2/3 of eye from lash line to top of crease with fluff brush. Inside edge is curved. Press and polish in layers and you blend up. Diffuse top edge with a clean brush to blend and merge with brow highlight.
2 - Dark Shadow as Liner: Begin liner at outer end of eye. Follow the lash line. Taper and fade at the inside edge of the iris. Thicken the last 1/3 between the outer edge of the iris and end of the eye. Use dark shadow alone with small angle brush for a soft and natural look. For a stronger look, start with a kohl pencil l in the same manner then trace over, smudge, and set with Dark Shadow 1 with small angle brush.
3 - Dark Shadow: is added for bottom line with an open-ended finish for more definition and elegance with small angle brush.
4 – Light Shadow: Apply and polish under last 2/3 of eyebrow to highlight with fluff brush or fingertip. Press and wrap around tear duct with cotton swab ‑ makes eyes pop!

1

2

3
Top & Bottom Eye Emphasis
The Graduated/Ombre pattern is transformed into the Sultry/Smoky Eye look with just three more steps by wrapping the same colours underneath the bottom of the eye to elevate eyes for evening elegance and drama.
5 - Medium Shadow: Continues from step 1. The same colour wraps under eyes completely with small angle or pencil brush. Connect outer end to end of crease. Expand, soften, and diffuse edge.
6 – Dark Shadow: Covers eye lid. Top edge blends into bottom of crease. with fluff brush. Press and polish in layers until smooth and even. Diffuse top edge with a clean brush to blend and merge with medium shade. Wraps tightly under eyes and within the medium shadow with small angle or pencil brush for definition.
7 – Dark Pencil and/or Shadow: Outline entire eye with black pencil. It should be thinnest at the nose and wider at the ear. Trace over and smudge with dark shadow with small angle or pencil brush to shape, smoke, smudge, and set. For more drama and grit, the water line is rimmed with black pencil. Alternatively, a flesh-toned pencil can be used to expand the opening and brighten the eye.
Complete this dramatic look with 2-3 coats of mascara or a pair of glamour false lashes.

5

6

7
The Glamourous Sculpted Eyeshadow Pattern


Gracefully sculpted to graphically glamourous the Sculpted Eyeshadow Pattern illustrates the same three shades used in the Graduated pattern, plus the addition of one more darker eyeshadow shade craftly placed in the Glam zone. The outer finish sweeps upwards at a 45-degree angle and makes eyes smile. Suits all types especially “deep-set” and “down-turned-eyes”.
Tip: For high-contrast highlights, apply a light, shimmery or metallic colour on the inner part of the eye lid. Use a cotton swab to frame the tear duct and lightly buff under brow.
Top Eye Emphasis
1 - Light Shadow: Shown with tiny dots, covers eye lid x 2 and on the last 2/3 under eyebrow press and polish on with fluff brush. Wraps around tear duct with cotton swab. For glam time, use a shimmery or metallic colour on the inner part of the eye lid and under the brow for high-contrast highlights.
2 – Medium 1 Shadow: With eyes open, hold brush perpendicular and begin on * at outer end of eye. Without lifting the brush, move back and forth following the bottom edge of the orbital bone to contour along crease (middle third) with round, quill, or one side of filbert chisel brush. Wipe brush out on paper towel to diffuse top edge of crease and fade into brow highlight. A clean Quill brush also works for blending and diffusing. Repeat for more intensity. For extra oomph, I almost always softly buff blush, or bronzer over the top edge of crease or layer a different colour similar in tone for more dimension for a synced sophistication.
3 – Dark Shadow 1 as Liner: Begin liner at outer end of eye. Follow the lash line. Taper and fade at the inside edge of the iris. Thicken the last 1/3 between the outer edge of the iris and end of the eye. Use dark shadow alone with small angle brus for a soft and natural look. For a stronger look, start with a kohl pencil in the same manner then trace over, smudge, and set with Dark Shadow 1 with small angle brush.

1

2

3
Top & Bottom Eye Emphasis
The next eye makeup steps elaborate, exaggerates, and elevates the Sculpted Eyeshadow Pattern by wrapping the same colours underneath the bottom of the eye for to elevate eyes for evening elegance and drama.
3 - Wrap Medium I, to line under the eyes with small angle or pencil brush. Connect outer end to end of crease. Expand, soften, and diffuse edges.
4 – Medium 2 Shadow: Here we will create a second cut-crease within the Medium 1 shade. Follow along bottom of first crease. This is where the strongest deposit of colour is placed. Wrap tightly under eyes, within the medium shadow and close to lash line with small angle or pencil brush.
5 – Dark Shadow I and Eye Liner Pencil: Outline entire eye with pencil, thin at the nose and wider at the ear. Trace over and smudge with Dark Shadow II with small angle or pencil brush to refine, smoke and set. Make your eyes look even bigger with a flesh tone eye liner pencil applied to the waterline.
6 - The Viva Glam Element – This artistic element glamorously sculpts and elongates the eye and can also be applied to the Graduated eye makeup design. Dark Shadow I: Placed at end of the eye with pencil brush to form a sideways “V”. Begin at outer corner/junction where the top eyeliner ends. Carefully weave this shade along the bottom of crease. Fade and taper the inside edge at the inner edge of iris. Work back and forth to ensure smoothness. Blend the top edge to merge into Medium

3

4

5

6
Shadow 2. Emphasize the outer corner while carefully connecting top and bottom eyeliner without surpassing the perimeters of Medium 2 For extra oomph, softly buff blush, or bronzer over the top edge of crease for a synced sophistication. For the ultimate glam eye, rim waterline with black eye liner pencil. Shown with the DDB Majestic Eye Palette.
Complete this dramatic look with fluttering glamour-puss false lashes.
“The Marilyn Eye”

This Iconic “Bedroom Eye” makeup design was fashioned and popularized by the legendary Marilyn Monroe. It continues to be a classic “top eye makeup” look and an obsession with YouTube stars and fans who have reimagined and interpretate into a phenomenon pushing the look into a more exaggerated and theatrical trend. Cat liner, glitter lid, cut crease, ombre brow and pushy false eye lashes comprise this almost drag like portrait. The original design is much more elegant and emphasizes the top of the eye with nothing under the eye. The design separates and lifts the eyes up and into a 45-degree angle finish. It is recreated by applying light on the eye lid and under the brow, a medium tone in the crease to softly sculpt and sweeps up within the outer eye frame. This sexy look is completed with black winged-up Cat Liner, originally called “The Devil’s Horn pick”. Ideal for all eyes especially down-turned eyes. Marilyn added demi (half lashes) at the outside ends of her eyes for that special gaze we won’t ever forget.

I hope your enjoyed and learned from this special eye makeup guide. With just a little trial and error, you’ll be highlighting and sculpting your eyes with finesse. Enjoy the rave reviews.
These pages are an excerpt from my forth coming makeup book entitled:
“Let’s Face It! — an Illustrated Guide to the Art of Classic Beauty Makeup
You’re invited to join my mailing list to be the first to know about its debut and exciting events planned for it. Simply visit my website and sign-up. See you there.
Beauty Back-Up
The Ultimate Makeup Lesson — Nothing beats one-on-one attention when it comes to learning how to do your own makeup. Dino Dilio’s the Ultimate Makeup Lesson, an unmatched, personalized, and revitalizing beauty experience that provides answers, substance, results and most importantly, an easier path to personal beauty satisfaction. This one-of-a-kind service goes to prove that experience and expertise matters and makes an impressive difference for learning the art of making up.
Beauty Maintenance & Advise — Visit my website to read my blogs on learning how to professionally Clean and Sanitize Your Makeup Brushes, The Top 5 Makeup Wipes, Skin and Sun Care and More…
www.dinodilio.com/sanitation-practices-protocols-and-policies & https://www.dinodilio.com/cleaning-makeup-brushes
DDB Makeup — is available in the on-line DDB Shop and is shipped worldwide.
www.dinodilio.com/ddb-makeup-shop
MU 411 — Have a question, need advice? I’m happy to answer via e-mail or arrange a complimentary 15-minute virtual session. Simply E-mail: info@dinodilio.com
Follow Me — Are you following me on Instagram? I hope so. If not, please click here!
Acknowledgement: Cover Illustration by David Downton